
5 Secrets to Capturing Stunning Light with Your Drone
- Drew Pertl

- Nov 30, 2021
- 3 min read
Updated: Jun 30, 2022

Secret #1: When to Find the Best Light
You can find great light during the first hour after sunrise and one hour before sunset, which is commonly referred to as Golden Hour. But if you really want the BEST light, you'll find it just after sunrise. During this time the warm sun begins to heat the cool ground. As the ground warms it releases moisture into the atmosphere and creates haze. This haze is EXACTLY what you should be looking for!
The more haze that's in the air the more dramatic the light. So find a morning after a heavy storm and you'll have great conditions for your shoot.

Secret #2: How to Get the Exposure Right
Getting a properly exposed image can be the most difficult part of capturing brilliant light with your drone. Luckily, most drones have some built in tools to help.
The first tool is your Exposure Meter. The exposure meter tells you if your overall image is properly exposed. If the image is properly exposed the meter will read EV 0.0. If it's one stop too bright it will read EV +1.0, one stop too dark would be EV -1.0 and so on. What we want to do is use this meter to underexpose our image between EV -0.3 and EV -0.7. This enables us to capture more details in the highlights and shadows that we can bring out later when we edit the RAW image.
The second tool is called Zebra Stripes. This is a pattern that overlays the image on your screen to show what areas are at risk of being overexposed a.k.a. too bright. To use this tool go into your drone's settings and enable the Over Exposure Warning. Keep this tool enabled and adjust your camera settings so you see only a small amount of zebra's on the brightest parts of your image.
The third tool is your Histogram. I could write pages on reading a histogram but simply put this scope helps you visualize the overall exposure of your image. 100% black is on the left side and 100% white is on the right. So a perfectly exposed image would have exposure values falling somewhere in the middle. Like zebra stripes, the histogram is meant to help you evaluate your image and won't always be perfect. So use this tool along with your zebra's and adjust accordingly.

Secret #3: Where to Place the Sun in Your Image
Where you place the sun in your photo can make a huge difference in the quality of your overall image. If the sun is directly visible you'll probably find yourself with parts of the image that look way too bright or way too dark. To solve this try placing the sun just out of view or behind your subject. This will allow you to properly expose the image AND capture details in the highlights and shadows.

Secret #4: What File Format You Should ALWAYS Use
Most drones have the option of shooting in either RAW or JPEG format. If you plan to edit your images (which you always should) shoot in RAW. This captures the raw data directly from the camera's image sensor and saves more color and tonal data that you can manipulate later in editing. The file size will be larger, but it's 100% worth it.
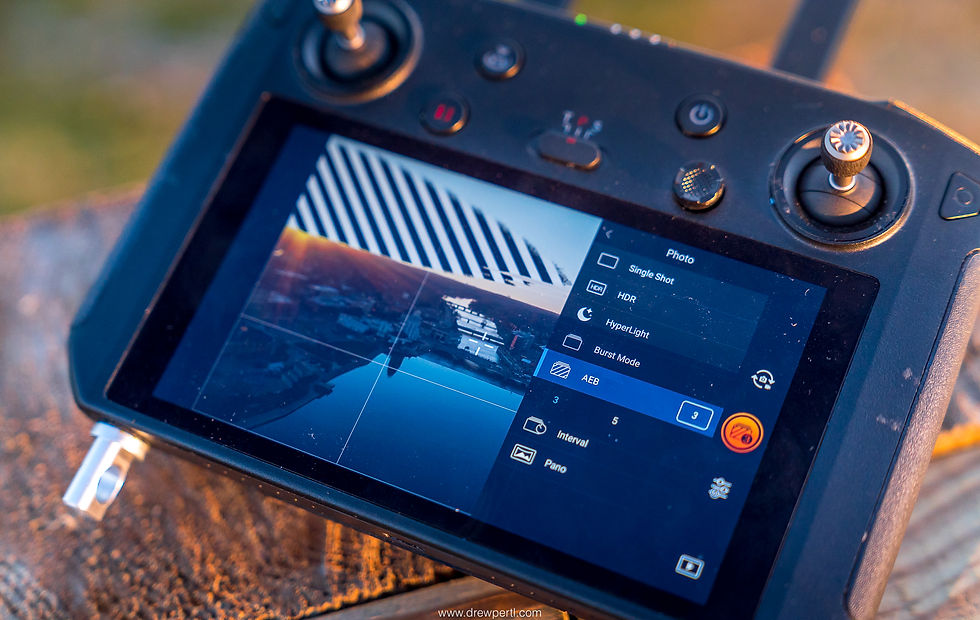
Secret #5: How to Give Yourself More Options in Editing So You Always Get the Shot
Automatic Exposure Bracketing also known as AEB is a shooting mode that takes a burst of photos each time you snap the shutter. With this mode the drone will take one image with the current settings you have and then take additional images spacing each exposure one stop apart. I normally recommend setting your bracketing to either 3 or 5 photos. This will ensure that even if you don't have your exposure set perfectly that you'll at least get one image in the batch that's close enough.
Thanks for Reading!


Comments