
8 Tips for Better Drone Photos
- Drew Pertl

- Jun 30, 2022
- 5 min read
Updated: Oct 1, 2022

You have your drone and you're ready to get some epic shots. Here are 8 things you need to do BEFORE you quit your day job to become a pro.
Tip #1: Shoot Things People WANT to See

If you want people beyond your close friends and family to like your drone photos then you need to shoot things people want to see.
Note sure what people want to see? Start by asking yourself who you're shooting for. Are you trying to attract a certain crowd? Are they fans of a specific place, activity or event? Once you have an idea of who target market is put yourself in their shoes and imagine what they want to see.
Example: I love to shoot around in the Fox Valley area where I live, so I focus a lot on local landmarks because that's something the audience I'm focused on enjoys.
Tip #2: Have a Clear Subject

A really common mistake new drone photographers make is shooting everything from the highest altitude possible. The problem is once you've seen a one neighborhood from 400 ft during the middle of the day you've pretty much seen them all. So if you want your photo to stand out then don't make the viewer guess what they should look at. Instead, give them a clear subject from an awesome new perspective.
Cityscapes may feel like an exception to this rule but the best cityscape photos have a subject that balances the shot. Start by finding your subject and then build your shot around it. Use other buildings as foreground elements and position the sun so it adds interest to the scene and illuminates your subject.
Tip #3.: Nail the Focus!
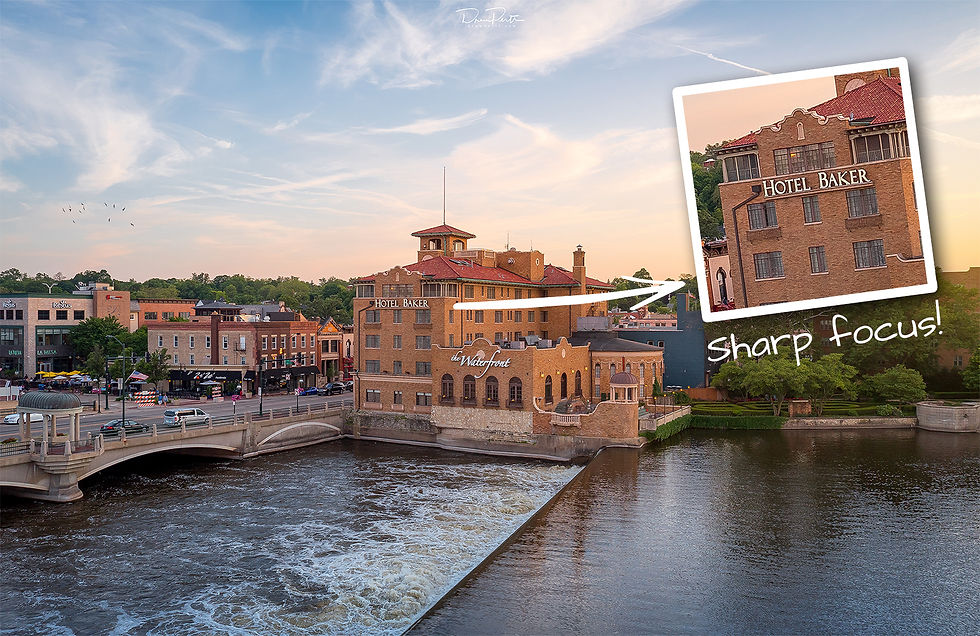
You can capture the most amazing scene with the best lighting, weather conditions, etc. But the hard truth is if it's not in focus then you didn't get the shot.
Get familiar with your drone's settings and make sure you're getting consistently sharp photos. Make sure to consider the wind speed when determining your shutter speed. I recommend checking the current weather conditions along with wind speed before you fly because high winds can make sharp photos nearly impossible.
I recommend a free iPhone app called Drone Buddy
Tip #4: Expose Correctly

Having a properly exposed image is the hallmark of a professional photographer. To give your work the look of a pro make sure you can see the maximum amount of detail in your highlights and shadows. For more information on exposure check my other blog post here.
Tip #5: Show a Unique Perspective

The absolute coolest part of shooting with a drone is the unlimited creative possibilities. As humans our perspectives have largely been limited to highest point we could climb. While we've had planes and helicopters for the past 100 years or so, the average enthusiast couldn't afford to use them for their everyday photography projects. Then DJI came out with the first ready to fly drone in 2013 and changed the game!
Where drones have a huge advantage over large manned aircraft is that they can get places that the others can't. They can get lower, closer, and in between things to create views that have never been possible until now. So if capturing something for the first time ever doesn't excite you, please stop reading now...
When looking for a new perspective ask yourself how your subject has been photographed in the past. Imagine what the limitations where that required it to be photographed that way. Now think how those limitations no longer apply to you! How will you photograph your subject differently? How can you show your audience something they've never seen before?
Tip #6: Create Symmetry

Your goal is to capture an image that feels balanced and leads your viewer's eye through the scene to your subject. Look for leading lines likes roads to guide the viewers eye and use the rule of thirds to balance the overall image. I normally like to place my subject in the middle third of my image with the foreground in the bottom third and the sky in the top.
Tip #7: Shoot in the Best Conditions

When I first got in to photography, I remember attending a lecture and hearing a speaker say that he "never shoots in clear weather" and he "never shoots at noon". That didn't really make sense to me until I started noticing that my work was significantly better when I shot early in the morning, around sunset or after a storm. Then it clicked! So I started planning my photo outings around the weather forecast and what conditions would be best for my subject. Anytime there was rain, I made it a priority to shoot the sunrise or sunset directly after. Knowing the moisture in the air would create the ideal conditions for haze and rays of light as the sunlight beams through.
A general rule of thumb to remember is that when the sun is lower in the sky the light is far more interesting. Below are the best times to shoot and the conditions you can expect to find.
After Rain - One of the best times to shoot. Look for dramatic clouds, light and haze.
Sunrise - Look for golden light and haze from the changing temperature.
Sunset - Watch for golden light, colorful clouds and long shadows on the ground.
Blue Hour - The best time to shoot a scene with artificial lights. Look for street lights, marquees and lit up buildings for especially cool shots.
Tip #8: Use the Sun Purposefully

It should be no secret that good light is the secret sauce of great photos. For drone photography the primary light we use is the sun, so you must consider the sun's position relative to your subject for every shot. Placing the sun behind your subject can create a striking halo effect that draws the eye. While placing the sun to the side of your subject can provide a nice warm edge light that's flattering to pretty much everything.
I start each shot by deciding what my subject is then framing it up in my viewfinder. Once the the subject is in frame, I then maneuver my drone around to find the best angle based on the position of the sun. Once I find something I like, I get a couple shots and then add just a bit of variation. I try moving slightly up, down, forward, back, left, right, etc. to see how the light may change. As I work the scene, I often discover new things I like or capture some action in the frame that adds a little extra something to the image. This gives me more options in editing later and always results in a far better photo.
Please share any questions or comments in the discussion below.
Thanks for Reading!


Comments